
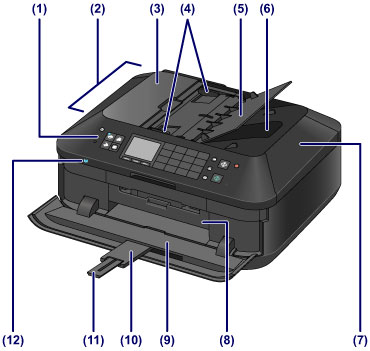
(1) operation panel
Use to change the settings of the machine or to operate it.
(2) ADF (Auto Document Feeder)
Load a document to copy, scan, or fax. The documents loaded in the document tray are scanned automatically one sheet at a time.
![]() Loading Documents in the ADF (Auto Document Feeder)
Loading Documents in the ADF (Auto Document Feeder)
(3) document feeder cover
Open when clearing jammed documents.
(4) document guides
Adjust these guides to match the width of document in the ADF.
(5) document tray
Open to load a document in the ADF. You can load two or more sheets of document of the same size and thickness. Load the document with the side you want to scan facing up.
(6) document output slot
Documents scanned from the ADF are delivered here.
(7) document cover
Open to load an original on the platen glass.
(8) inner cover
Open by pulling it out to attach the disc tray. Use only when printing onto a printable disc.
Keep closed for normal operation.
(9) paper output tray
Opens automatically when printing or copying starts and printed paper is ejected.
(10) output tray extension
Opens automatically when you open the paper output tray, and supports ejected paper.
(11) paper output support
Extend to support ejected paper.
(12) Wi-Fi lamp
Lights or flashes blue to indicate the wireless LAN status.
Lights:
Wireless LAN active is selected.
Flashes:
Printing or scanning over wireless LAN. Also flashes while searching for wireless LAN access point during setup and when connecting to the access point.
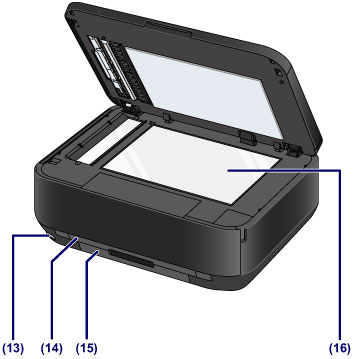
(13) USB flash drive port
Insert a USB flash drive to this port.
You can connect the optional Bluetooth Unit BU-30* to print directly.
![]() Printing from a Bluetooth Compliant Device
Printing from a Bluetooth Compliant Device
* The Bluetooth Unit is not available in some countries or regions depending on the local laws and regulations. For details, contact the service center.
 Warning Warning
|
 Important Important
|
(14) cassette (upper)
Load 4" x 6" (10 x 15 cm) or 5" x 7" (13 x 18 cm) size photo paper into the cassette, and insert it into the machine. Two or more papers of the same size and media type can be loaded at the same time, which are fed automatically one sheet at a time.
The disc tray can be stored in the back of the cassette (upper).
![]() How to Detach / Attach the Disc Tray
How to Detach / Attach the Disc Tray
(15) cassette (lower)
Load A4, B5, A5, or Letter-sized plain paper or photo paper and envelopes into the cassette, and insert it into the machine. Two or more papers of the same size and media type can be loaded at the same time, which are fed automatically one sheet at a time.
(16) platen glass
Load an original to copy, scan, or fax.
Page top |


